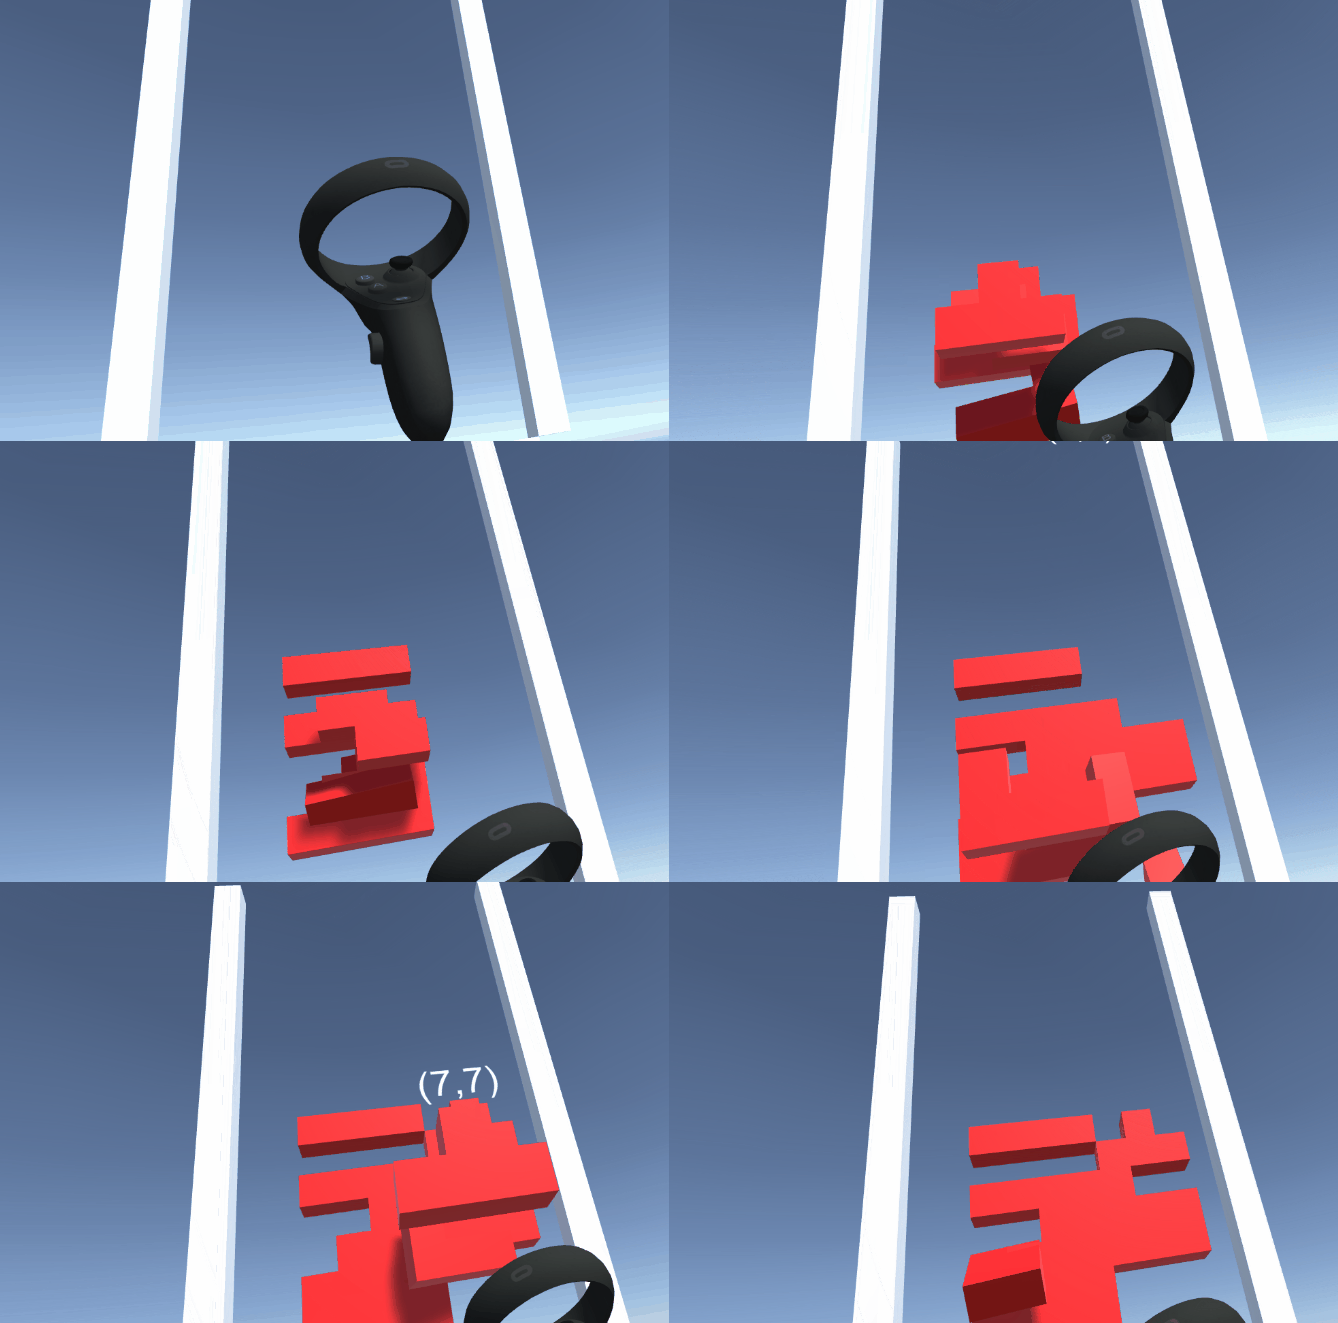
今回はいよいよテトリスらしいブロックを作成していきます。
これまでは、ただの四角いキューブでしたが、テトリスブロックは長いものや、四角いもの、凸の形状のものなどがあります。
それぞれのブロックをユニット単位として生成し、シューティングテトリスのゲームロジックに組み込んでいきます。
前回の記事↓

【準備】Block.csの作成
まず、各ブロックがフィールド上のどこにあるかを記憶させるため、Block.csを作成しましょう。
中身は次のように記述してください。
|
1 2 3 4 5 6 7 8 9 10 11 12 13 14 15 16 17 18 19 20 21 |
using System.Collections; using System.Collections.Generic; using UnityEngine; public class Block : MonoBehaviour { [SerializeField] public int x,y; //判定用 // Start is called before the first frame update void Start() { } // Update is called once per frame void Update() { } } |
ここで使用する個所は、int型のx,yのみです。例えば、block[5,12]の位置にあるブロックはx=5, y=12が格納されるようになります。
そして、プレハブのBlockにBlock.csをAddComponentしてください。
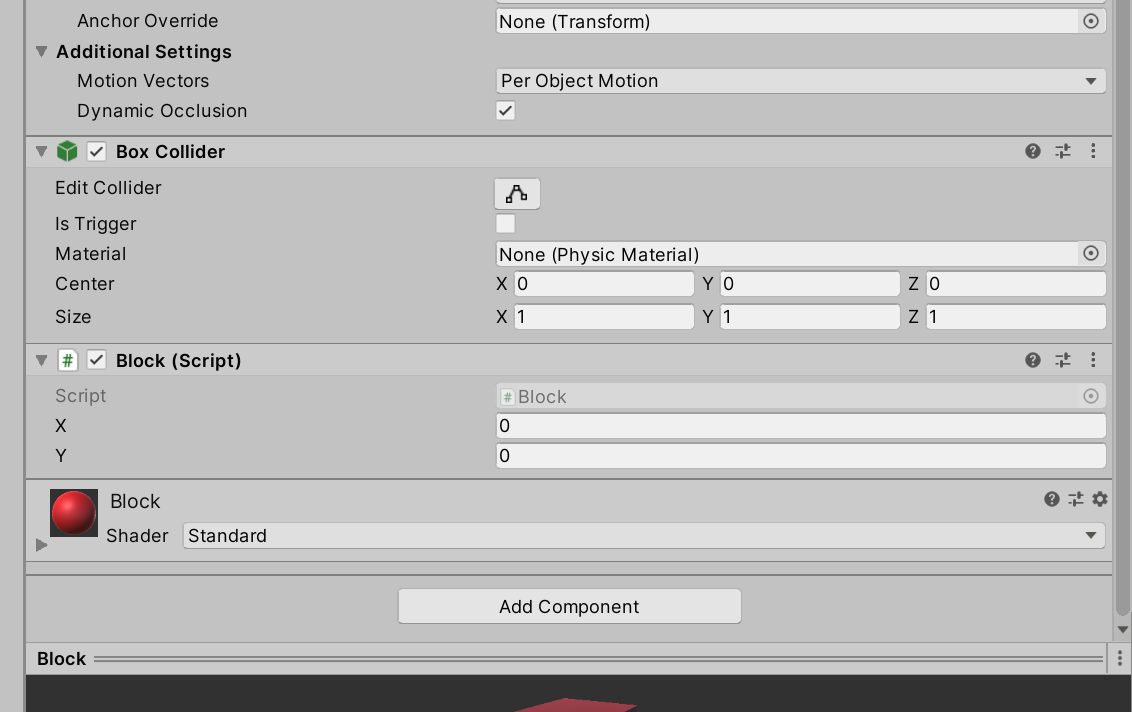
ブロックユニットの作成
まずは、ブロックの種類を決めるためのブロックタイプを作成していきます。
ブロックタイプの定義
BlockBazooka.csのBlockBazookaクラスの手前にBlockTypeという名前の構造体を作成してください。
|
1 2 3 4 5 6 7 8 9 10 |
// ブロックタイプを定義する構造体 public struct BlockType { public int[,] shape; //形状を定義する配列 } public class BlockBazooka : MonoBehaviour { // 省略 } |
この構造体の中に定義されたshapeは、int型の二次元配列で定義され、要素の中身が0の部分にはブロックがない状態を、1の部分にはブロックがある状態を示すようにします。
では、それに併せてBlockBazookaクラス内も修正していきます。BlockTypeの配列であるblockTypeとCreateBlockType関数を以下のように記述してください。
|
1 2 3 4 5 6 7 8 9 10 11 12 13 14 15 16 17 18 19 20 21 22 23 24 25 26 27 28 29 30 31 32 33 34 35 36 37 38 39 40 41 42 43 44 |
// ブロックタイプの作成 [SerializeField] BlockType[] blockTypes; // ブロックの種類を定義 void CreateBlockType() { blockTypes = new BlockType[7]; blockTypes[0].shape = new int[,] { {0,0,0,0}, {0,0,0,0}, {1,1,1,1}, {0,0,0,0}, }; blockTypes[1].shape = new int[,] { {1,1}, {1,1}, }; blockTypes[2].shape = new int[,] { {0,1,0}, {1,1,1}, {0,0,0}, }; blockTypes[3].shape = new int[,] { {0,0,1}, {1,1,1}, {0,0,0}, }; blockTypes[4].shape = new int[,] { {1,0,0}, {1,1,1}, {0,0,0}, }; blockTypes[5].shape = new int[,] { {1,1,0}, {0,1,1}, {0,0,0}, }; blockTypes[6].shape = new int[,] { {0,1,1}, {1,1,0}, {0,0,0}, }; } |
CreateBlockType関数では、実際のテトリスでも見たことのある7種類のブロックタイプを定義しています。このブロックタイプを変えることにより様々なブロックの形状で遊ぶことも可能です。
このCreateBlockType関数をゲーム開始のタイミングで実行させたいため、BlockBazooka.csのStart関数を以下のように記述してください。
|
1 2 3 4 5 6 7 |
void Start() { // 左右どちらのコントローラかを取得 controller = GetComponent<OVRControllerHelper>().m_controller; CreateBlockType(); } |
ブロックタイプを基にブロックユニットを作成
次に、BlockTypeから実際にブロックユニットを生成する関数を以下のように記述していきます。
|
1 2 3 4 5 6 7 8 9 10 11 12 13 14 15 16 17 18 19 20 21 22 23 24 25 |
//ブロックを生成 GameObject CreateBlock(int typeNum) { int size = blockTypes[typeNum].shape.GetLength(0); GameObject blockUnits = new GameObject("BlockUnits"); // 物理演算を適用させるためRigidbodyを追加 blockUnits.AddComponent<Rigidbody>(); // 二次元配列をループで処理 for(int i=0;i<size;i++) { for(int j=0;j<size;j++) { // ブロックを配置する位置であればブロックを生成 if(blockTypes[typeNum].shape[j,i]==1) { GameObject go = Instantiate(blockObj); go.transform.parent = blockUnits.transform; // ブロックを生成する位置は親オブジェクトの相対位置で決定 go.transform.localPosition = new Vector3(i-size/2,size/2-j,0)*0.1f; } } } return blockUnits; } |
今回は、第一引数のtypeNumを使用して、blockTypes中の好きな形状を生成する関数として作成しています。親オブジェクトであるblockUnitsにRigidbodyを割り当てFire関数で発射できるように設定しています。
二次元配列は正方行列なのでループの上限値はsizeで抑えています。
また、if(blockTypes[typeNum].shape[j,i]==1)に関しての注意点について。元々、iはx方向を、jはy方向でループを回しています。
ここで、shape[i,j]と記述するとshape[x方向, y方向]となり正しいように見えますが、
blockType[6].shapeの要素は以下のように参照できます。
shape[0,0] = 0 shape[0,1] = 1 shape[0,2] = 1
shape[1,0] = 1 shape[1,1] = 1 shape[1,2] = 0
shape[2,0] = 0 shape[2,1] = 0 shape[2,2] = 0
上の要素番号の流れをよく見ると、shapeの要素はshape[y方向, x方向]になっていることが分かります。
そのため、「shape(j,i)」と記述していることに注意してください。
このブロックユニットを生成すると、下のような親子関係で出力されます。

BlockUnitsは空のゲームオブジェクトで、複数の子オブジェクトがブロックユニットの形状になります。
Fire関数でblockUnitsを発射できるように、Update関数を以下のように書き換えてください。
|
1 2 3 4 5 6 7 8 9 |
void Update() { //A/Xボタンを押したらブロックを発射 if(OVRInput.GetDown(OVRInput.Button.One,controller)) { // Fire(transform.position,transform.forward, blockObj)); Fire(transform.position,transform.forward, CreateBlock(Random.RandomRange(0,7))); } } |
さらに、Fire関数はCreateBlock関数で生成されたブロックユニットをそのまま発射するように、以下のように書き換えましょう。
|
1 2 3 4 5 6 7 8 9 10 |
//ブロックを発射する関数 void Fire(Vector3 startPos, Vector3 direction, GameObject target) { //ブロックのコピーを生成させないようにコメントアウト // GameObject go = Instantiate(target); //ブロックの発射位置を設定 target.transform.position = startPos; //ブロックをコントローラ正面方向に放つ target.GetComponent<Rigidbody>().AddForce(direction*10f,ForceMode.Impulse); } |
ブロックユニットを使用するための設定
最後に、この状態でプレハブのBlockのRigidbodyを削除してください。削除はInspectorの右上のボタン→Remove Componentでできます。
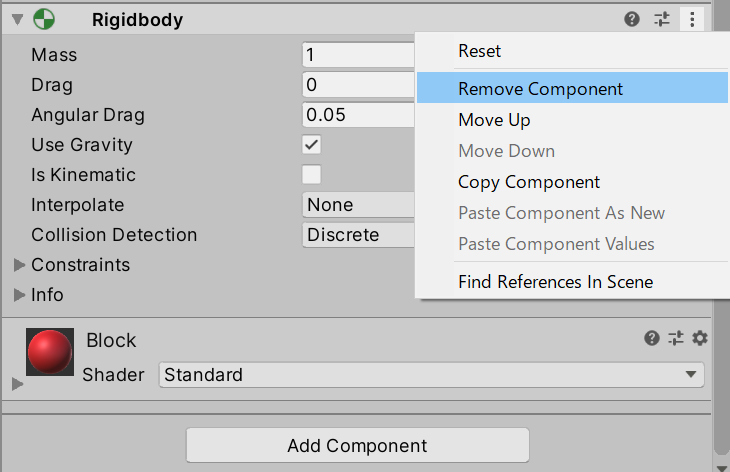
今回、ブロックの一塊としてブロックユニットを作成し、それがくっついた時、子オブジェクトのブロックを配置するようにしています。子オブジェクトにRigidbodyが付いているとブロック同士が衝突してしまうため上手く飛ばなくなります。
では、この状態で実行してみてください。ブロックユニットが配置できるようになったでしょうか?

はみ出したブロックを配置させない処理
現在の状態のままだと、すでにブロックが存在する場所にブロックを重ねて配置出来てしまいます。それに対処するため、Field.csのOnCollisionEnter関数を編集していきます。
|
1 2 3 4 5 6 7 8 9 10 11 12 13 14 15 16 17 18 19 20 21 22 23 24 25 26 27 28 29 30 31 32 33 34 35 36 37 38 39 40 41 42 43 44 45 46 47 48 49 50 51 52 53 |
void OnCollisionEnter(Collision other) { if (other.gameObject.tag != "blockUnits") return; var b = other.gameObject.transform.position; var u = 0.1f; var g = new Vector3( ((int)(b.x / u)) * u, //x座標 ((int)(b.y / u)) * u, //y座標 transform.position.z //z座標 ); //向きを一定にする other.gameObject.transform.rotation = Quaternion.Euler(0, 0, 0); //左下座標を定義 float px = -0.4f; float py = 0.1f; //blocksの要素番号を取得 int bx = GetPosition((g.x - px) / u, 0.01f, 0, 10); int by = GetPosition((g.y - py) / u, 0.01f, 0, 20); //範囲外ならエラーを帰す if (bx < 0 || by < 0 || bx >= 10 || by >= 20 || CheckExistBlock(other.gameObject, bx, by)) { } else { //座標を反映 other.gameObject.transform.position = new Vector3(bx * u + px, by * u + py, transform.position.z); //配置された位置の配列をtrueにする ApplyBlockUnits(other.gameObject, bx, by); // 位置を表示 GameObject sv = Instantiate(scoreViewObj); sv.transform.position = other.gameObject.transform.position; sv.GetComponent<ScoreView>().textMesh.text = $"({bx},{by})"; // 親オブジェクトを削除 int cnt = other.transform.childCount; for (int i = 0; i < cnt; i++) { other.transform.GetChild(0).parent = null; } other.transform.tag = "Untagged"; other.transform.position = Vector3.forward * 1000f; } } |
まず、冒頭のif文により、タグが”blockUnits”のゲームオブジェクトのみ処理されるようにします。
そして、以下のif文を使用して、フィールド外およびブロックが配置されていないかどうかをチェックします。
|
1 |
if(bx < 0 || by < 0 || bx >= 10 || by >= 20 || CheckExistBlock(other.gameObject,bx,by)) |
このCheckExistBlock関数は、次のように実装していきます。
|
1 2 3 4 5 6 7 8 9 10 11 12 13 14 15 16 17 18 19 20 21 |
// その位置にブロックが存在するかチェックする関数 bool CheckExistBlock(GameObject target, int x, int y) { for (int i = 0; i < target.transform.childCount; i++) { Vector3 g = target.transform.GetChild(i).localPosition; int bx = (int)(g.x * 10); int by = (int)(g.y * 10); //枠外にはブロックが存在することにしておく if( x + bx < 0 || y + by < 0 || x + bx >= 10 || y + by >= 20) { return true; } // (x+bx,y+by)の位置にブロックが存在しているかどうかチェック if (!(x + bx < 0 || x + bx >= 10 || y + by < 0 || y + by >= 20) && blocks[x + bx, y + by]) { return true; } } return false; } |
これは、BlockUnitsの子オブジェクトの座標を基に、ブロックが配置できるスペースがあるかを検知する関数となっています。
では、OnCollisionEnter関数の説明に戻ります。複数個のブロックを同時に設定する処理は以下のように編集して実装しています。
|
1 2 3 |
//配置された位置の配列をtrueにする // blocks[bx,by] ApplyBlockUnits(other.gameObject,bx,by); |
このApplyBlockUnits関数は、次のように実装します。
|
1 2 3 4 5 6 7 8 9 10 11 12 13 14 15 16 17 18 19 20 21 22 23 24 25 26 27 28 29 30 31 32 33 34 35 36 37 38 39 |
// ブロックを登録する関数 void ApplyBlockUnits(GameObject target, int x, int y) { blockList = new List<GameObject>(); for (int i = 0; i < target.transform.childCount; i++) { Vector3 g = target.transform.GetChild(i).localPosition; int bx = (int)(g.x * 10); int by = (int)(g.y * 10); blocks[x + bx, y + by] = true; //判定用の座標を設定 target.transform.GetChild(i).GetComponent<Block>().x = x + bx; target.transform.GetChild(i).GetComponent<Block>().y = y + by; //参照できるように名前を設定 target.transform.GetChild(i).name = $"name:{x + bx},{y + by}"; //落下用ゲームオブジェクトに設定 blockList.Add(target.transform.GetChild(i).gameObject); } } void SortBlockList() { for (int i = 0; i < blockList.Count; i++) { for (int j = i; j < blockList.Count; j++) { if (blockList[i].GetComponent<Block>().y > blockList[j].GetComponent<Block>().y) { var tmp = blockList[i]; blockList[i] = blockList[j]; blockList[j] = tmp; } } } } |
最後に、Unity上でEdit→Project Settings→Tags and Layoutsから「blockUnits」というタグを作成してください。これで準備完了です。
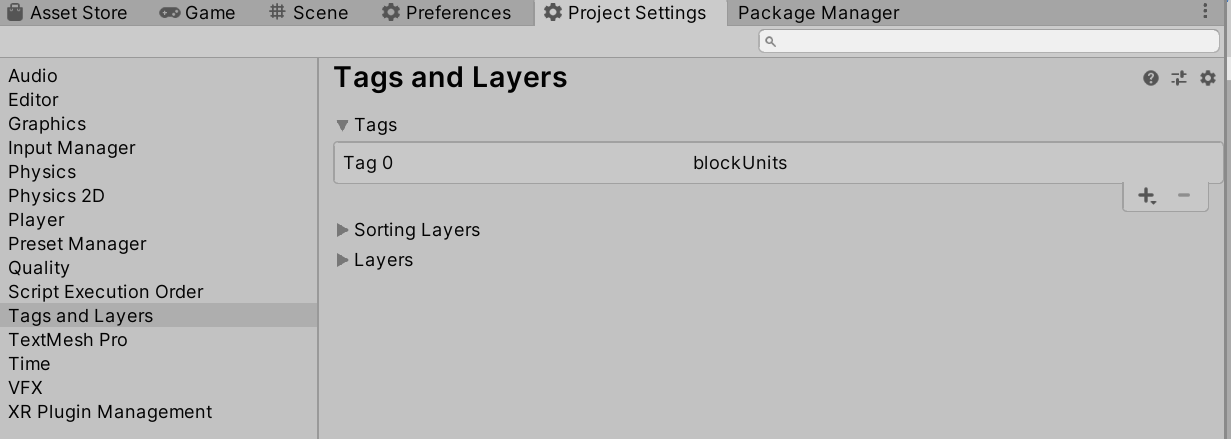
最後に、BlockBazooka.csでblockUnitsゲームオブジェクトに今設定したtagを追加します。
|
1 2 3 4 5 6 7 |
//ブロックを生成 GameObject CreateBlock(int typeNum) { int size = blockTypes[typeNum].shape.GetLength(0); GameObject blockUnits = new GameObject("BlockUnits"); blockUnits.tag = "blockUnits"; // 省略 |
実行すると、フィールド外やブロックが配置されているところに重ねて配置できなくなっている様子が確認できます。
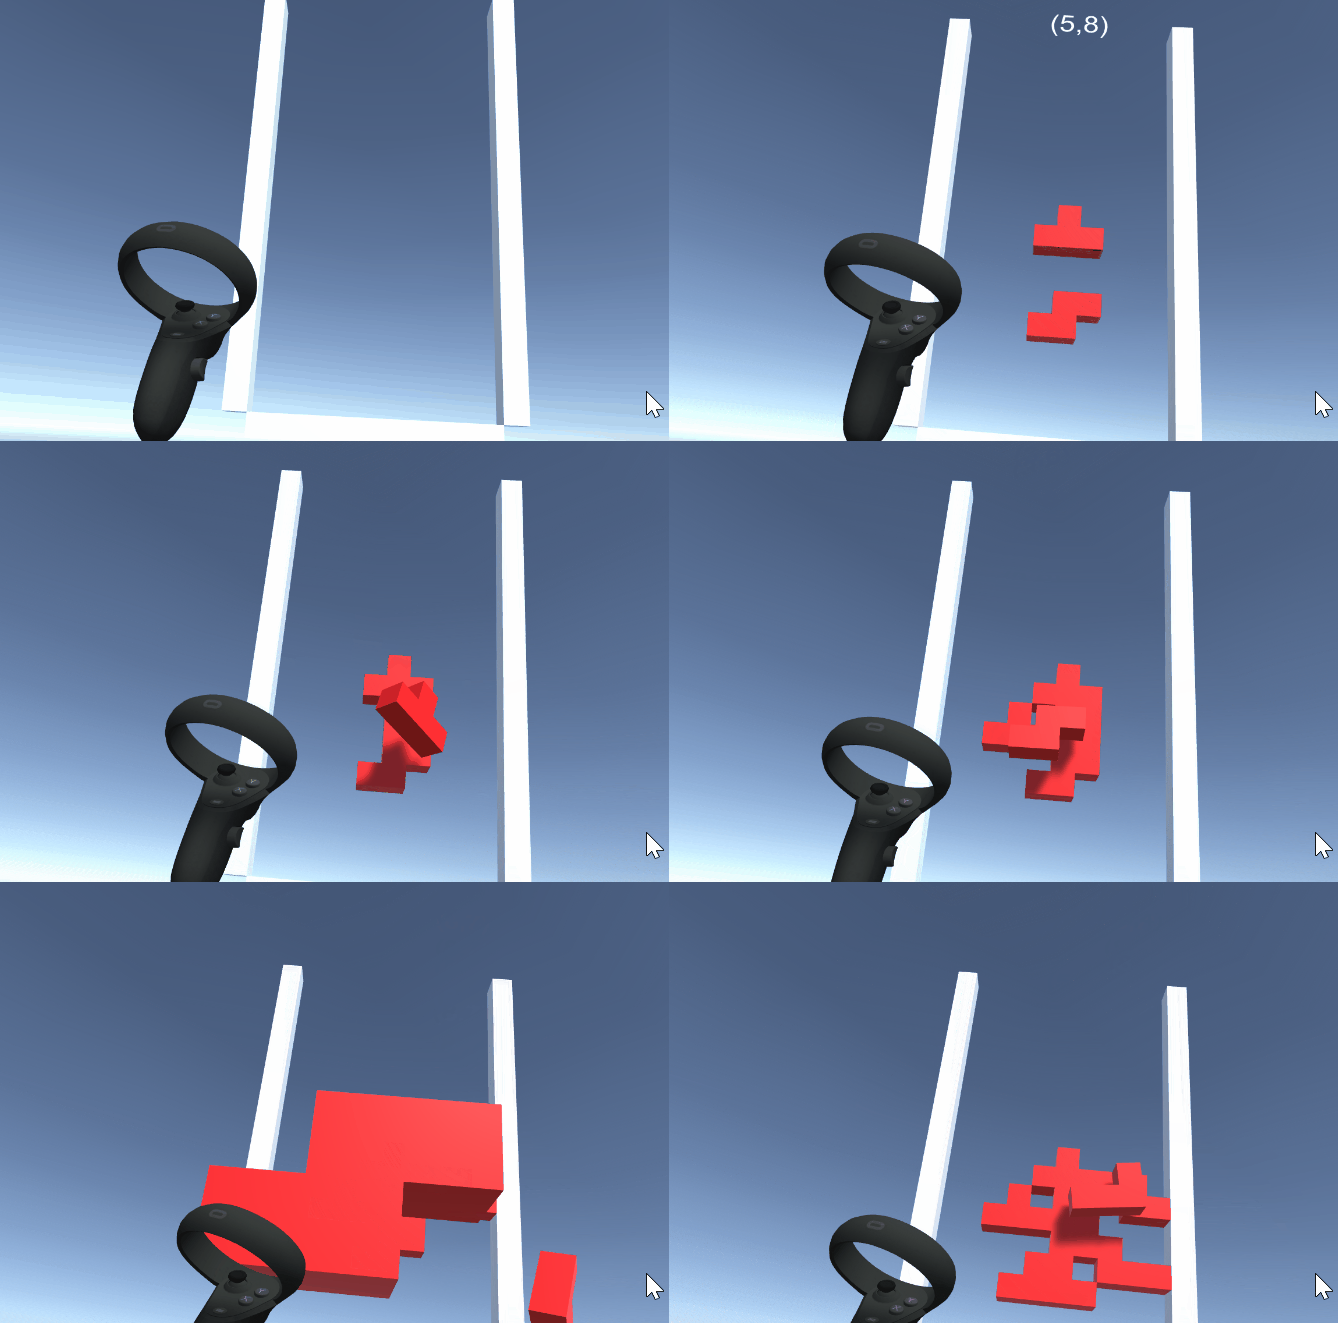
【微修正】ブロックが引っかかる不具合の修正
現段階の状態だと、ブロックが引っかかるような挙動を起こすことがあります。この原因は、ブロックのColliderがほかのブロックと衝突しあってしまうためです。
そのため、3行だけ追加して修正します。
Field.csのOnCollisionEnter関数内を以下のように修正してください。
|
1 2 3 4 5 6 7 8 9 10 11 |
//範囲外ならエラーを帰す if(bx < 0 || by < 0 || bx >= 10 || by >= 20 || CheckExistBlock(other.gameObject,bx,by)) { for(int i=0;i<other.gameObject.transform.childCount;i++) { Destroy(other.gameObject.transform.GetChild(i).transform.GetComponent<BoxCollider>()); } } else { // 以下略 |
ここでは、衝突したブロックが配置できない場合、子オブジェクトのブロックのBoxColliderを削除する処理を実装しています。
この状態で実行してみてください。ブロックが引っかからなくなったと思います。
次回予告
次回は、ブロックが落ちる処理を実装していきます。
次回の記事↓




コメント