前回の記事では3Dテトリス用のフィールドと1マス分のブロックの生成までを実現し、好きな形でブロックフィールドを生成する基礎システムを作りました。
前回の記事:

今回の記事では本格的なテトリスブロックを作成していきます。
落ちてくるテトリスブロックのコンポーネント作成
まず、落ちてくるブロックを表すコンポーネントを作成していきます。
新しく「Block.cs」というスクリプトを作成してください。保存先はお好みでOKですが、記事ではAssetsフォルダーに保存しています。
「Block.cs」の内容は次のようにしてください。
|
1 2 3 4 5 6 7 8 9 10 11 12 13 14 15 16 17 18 19 20 21 22 23 24 25 26 27 28 29 30 31 32 33 34 35 36 37 38 39 40 41 42 43 44 45 46 47 48 49 50 51 52 53 54 55 56 57 58 59 60 61 62 63 64 65 66 67 68 69 70 71 72 73 74 75 76 77 78 79 80 81 82 83 84 85 86 87 88 89 90 91 92 93 94 95 96 97 98 99 100 101 102 103 104 105 106 107 108 109 110 111 112 113 114 115 116 117 118 119 120 121 122 123 124 125 126 127 128 |
// Block.cs Blockコンポーネントの作成 using System.Collections; using System.Collections.Generic; using UnityEngine; enum Direction { Left, Right, Up, Down, Forward, Back, } enum RotateDirection { Minus, None, Plus, } static class DirectionUtils { static readonly Dictionary<Direction, Vector3> dirVectorDict = new Dictionary<Direction, Vector3>() { { Direction.Left, Vector3.left}, { Direction.Right, Vector3.right}, { Direction.Up, Vector3.up}, { Direction.Down, Vector3.down}, { Direction.Forward, Vector3.forward}, { Direction.Back, Vector3.back}, }; public static Vector3 GetDirVec(Direction dir) { return dirVectorDict[dir]; } public static Vector3Int Rotate(Vector3Int p, float deg, Direction axis) { var mat = Matrix4x4.Rotate(Quaternion.AngleAxis(deg, DirectionUtils.GetDirVec(axis))); var newPos = mat.MultiplyVector(p); newPos.x += newPos.x > 0 ? 0.5f : -0.5f; newPos.y += newPos.y > 0 ? 0.5f : -0.5f; newPos.z += newPos.z > 0 ? 0.5f : -0.5f; return new Vector3Int((int)newPos.x, (int)newPos.y, (int)newPos.z); } } class Block : MonoBehaviour { [SerializeField] GameObject MassPrefab; [SerializeField] BlockTemplate BlockTemplate; [SerializeField] Vector3Int _pos; public Vector3 MassSize = new Vector3(1, 1, 1); public Vector3Int Size { get => Instance?.Size ?? Vector3Int.zero; } public Vector3Int MinPos { get => Instance != null ? Pos + Instance.MinPos : Pos; } public Vector3Int MaxPos { get => Instance != null ? Pos + Instance.MaxPos : Pos; } [SerializeField] Direction _forward = Direction.Forward; [SerializeField] Direction _up = Direction.Up; BlockInstance Instance; public Vector3Int Pos { get => _pos; set { _pos = value; transform.localPosition = new Vector3( MassSize.x * _pos.x, MassSize.y * _pos.y, MassSize.z * _pos.z ); } } public Direction Forward { get => _forward; } public Direction Up { get => _up; } public void SetTemplate(BlockTemplate template) { BlockTemplate = template; CreateBlockGameObjects(); } void RemoveAllMass() { while (0 < transform.childCount) { var child = transform.GetChild(transform.childCount - 1); Object.Destroy(child.gameObject); } } void CreateBlockGameObjects() { RemoveAllMass(); if (BlockTemplate == null) return; Instance = BlockTemplate.CreateBlockInstance(); if (MassPrefab == null) return; for (var y=0; y<Size.y; ++y) { for (var z = 0; z < Size.z; ++z) { for (var x = 0; x < Size.x; ++x) { var obj = Object.Instantiate(MassPrefab, transform); obj.transform.localPosition = new Vector3( MassSize.x * (x - Instance.Origin.x), MassSize.y * (y - Instance.Origin.y), MassSize.z * (z - Instance.Origin.z) ); var type = Instance[x, y, z]; obj.SetActive(type == MassType.Mass); } } } } private void Awake() { Pos = Pos; } } |
「Block」コンポーネントは落ちてくるブロックを管理するものになります。
落下時の位置や回転処理などを行うメンバを定義していきます。
移動や回転処理などは今後の記事で実装していきます。
ブロックのバリエーションの作成 Scriptable Objectでデータを管理
次にブロックのバリエーションを作成できるようにしていきます。
「Block」コンポーネントには「BlockTemplate」フィールドというブロックの種類を表すメンバを用意しています。
実際に再生するときは「BlockTemplate」フィールドに設定されたものから「Instance」フィールドの内容を作成し、「Instance」フィールドがブロックの形を表します。
BlockTemplateクラスの作成
それではまず。「BlockTemplate」クラスを作成していきます。
新しく「BlockTemplate.cs」というスクリプトを作成してください。保存先はお好みでOKですが、記事ではAssetsフォルダーに保存しています。
「BlockTemplate.cs」の内容は以下のようにしてください。
|
1 2 3 4 5 6 7 8 9 10 11 12 13 14 15 |
// BlockTemplate.cs BlockTemplateクラスの作成 using System.Collections; using System.Collections.Generic; using UnityEngine; [CreateAssetMenu(menuName = "Block Template")] public class BlockTemplate : ScriptableObject { [TextArea(3, 5)] public string[] Slices; internal BlockInstance CreateBlockInstance() { return new BlockInstance(this); } } |
「BlockTemplate」クラスはScriptableObjectとして定義しています。
なので、ゲームに登場させたいブロック分「BlockTemplate」クラスのアセットを作成する必要があります。
アセットの作成は「BlockInstance」クラスを作成してから行いますので、先に必要なスクリプトを作成していきます。
BlockInstanceクラスの作成
次に再生中のブロックを表す「BlockInstance」クラスを作成していきます。
新しく「BlockInstance.cs」というスクリプトを作成してください。保存先はお好みでOKですが、記事ではAssetsフォルダーに保存しています。
「BlockInstance.cs」の内容は以下のようにしてください。
|
1 2 3 4 5 6 7 8 9 10 11 12 13 14 15 16 17 18 19 20 21 22 23 24 25 26 27 28 29 30 31 32 33 34 35 36 37 38 39 40 41 42 43 44 45 46 47 48 49 50 51 52 53 54 55 56 57 58 59 60 61 62 63 64 65 66 67 68 69 70 71 72 73 74 75 76 77 78 79 80 81 82 83 84 85 86 87 88 89 90 91 92 93 94 95 96 97 98 99 100 101 102 103 104 105 106 107 108 109 110 111 112 113 114 115 116 117 118 |
// BlockInstance.cs BlockInstanceクラスの作成 using System.Collections; using System.Collections.Generic; using UnityEngine; class BlockInstance { public BlockTemplate Template { get; private set; } public Vector3Int Origin { get; private set; } public Vector3Int Size { get; private set; } public Vector3Int MinPos { get; private set; } public Vector3Int MaxPos { get; private set; } public Direction Forward { get; private set; } = Direction.Forward; public Direction Up { get; private set; } = Direction.Up; MassType[,,] _data; public MassType this[int x, int y, int z] { get { return _data[x, y, z]; } set { _data[x, y, z] = value; } } public MassType this[Vector3Int pos] { get => this[pos.x, pos.y, pos.z]; set { this[pos.x, pos.y, pos.z] = value; } } public bool Contains(int x, int y, int z) { return 0 <= x && x < _data.GetLength(0) && 0 <= y && y < _data.GetLength(1) && 0 <= z && z < _data.GetLength(2); } public bool Contains(Vector3Int pos) => Contains(pos.x, pos.y, pos.z); public (int x, int y, int z) ToRotateCoordination(int x, int y, int z) { return (x, y, z); } public Vector3Int ToRotateCoordination(Vector3Int pos) { var p = ToRotateCoordination(pos.x, pos.y, pos.z); return new Vector3Int(p.x, p.y, p.z); } public BlockInstance(BlockTemplate template) { Template = template; CreateData(template); } (Vector3Int size, Vector3Int min, Vector3Int max) CalcSize(BlockTemplate template) { var minPos = Vector3Int.zero; var maxPos = Vector3Int.zero; maxPos.y = Template.Slices.Length; for (var y = 0; y < maxPos.y; ++y) { var lines = Template.Slices[y].Split('\n'); maxPos.z = Mathf.Max(maxPos.z, lines.Length); for (var z = 0; z < lines.Length; ++z) { var line = lines[z]; maxPos.x = Mathf.Max(maxPos.x, line.Length); } } return (maxPos, minPos, maxPos); } void CreateData(BlockTemplate template) { (Size, MinPos, MaxPos) = CalcSize(template); _data = new MassType[Size.x, Size.y, Size.z]; var origin = Vector3Int.zero; for (var y = 0; y < Size.y; ++y) { var lines = Template.Slices[y].Split('\n'); for (var z = 0; z < lines.Length; ++z) { var line = lines[z]; for (var x = 0; x < line.Length; ++x) { MassType mass; switch (line[x]) { case '#': mass = MassType.Mass; break; case 'o': origin = new Vector3Int(x, y, z); mass = MassType.Mass; break; default: mass = MassType.Empty; break; } _data[x, y, z] = mass; } } } Origin = origin; MinPos -= Origin; MaxPos -= Origin; } } |
「BlockInstance」クラスは再生中に「BlockTemplate」クラスから作成されるものになります。
作成された「BlockInstance」は「Block」コンポーネントの「Instance」フィールドに設定されます。
「Block」コンポーネントは「Instance」フィールドの内容からブロックの形状や回転状況を判断します。
テトリス用ブロックアセットの作成
ここまででスクリプトの準備ができましたので、次はブロックに必要なアセットを作成していきます。
ブロックのプレハブの作成
次にブロックのプレハブを作成します。
次の手順を行ってください。
- メニューのGameObject > 空のGameObjectをクリックしてください。
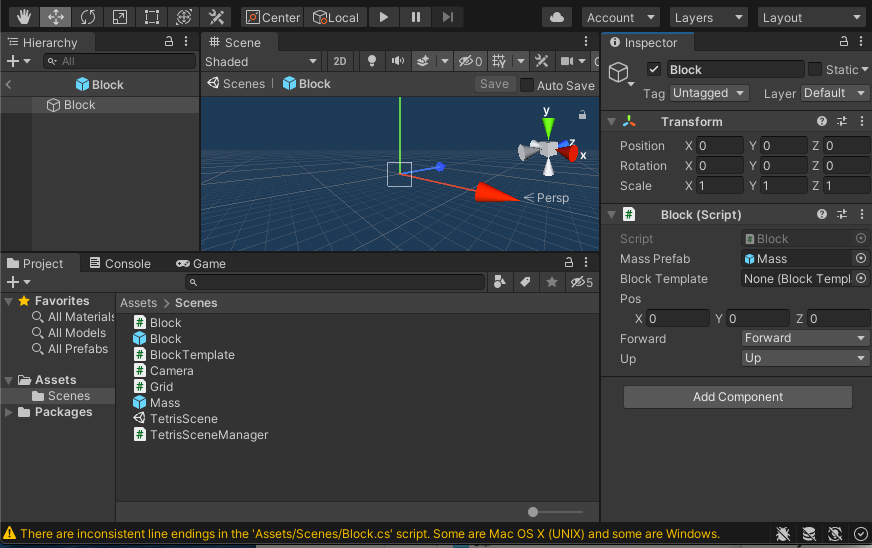
作成したGameObjectはプレハブ化し、名前を「Block」に設定してください。プレハブの保存先はお好みの場所でOKですが、記事ではAssetsフォルダーに保存しています。
プレハブを作成した後はシーンにあるGameObjectの方は削除してください。
「Block」プレハブの設定内容は次のものにしてください。
|
1 2 3 |
// Blockプレハブの設定内容 - Blockコンポーネント <- 追加 MassPrefab : 「Mass」プレハブを設定 |
デフォルトでは画面に何も表示されませんが、後々確認用の処理を追加します。
ブロックのテンプレートをScriptable Objectから作成
次に「BlockTemplate」クラスのアセットを次の設定内容から複数作成してください。
アセットの名前も指定してますが、わかりやすいものに変更してもOKですのでその辺りはお好みで決めてください。
また、保存先のフォルダーはお好みでOKです。記事では Assets > Blocksフォルダーに保存しています。
|
1 2 3 4 5 6 7 8 9 10 11 12 13 14 15 16 17 18 19 20 21 22 23 24 25 26 27 28 29 30 31 32 33 34 35 36 37 |
// ブロックのアセットの作成 Slicesに入力する文字には以下のものがあります。 - # ブロックマス - 0 ブロック全体の原点 必ず一つ入力する - ‘ ‘ 空白文字。何もなし。 ## Block1.asset //1マス Slices Length=1 index=0 o ## Block2.asset //縦長 Slices Length=1 index=0 #o## ## Block3.asset // でっぱり Slices Length=1 index=0 #o# # ## Block4.asset // 塊 Slices Length=2 index=0 o# ## index=1 ## ## ## Block5.asset // L Slices Length=1 index=0 o## # # |
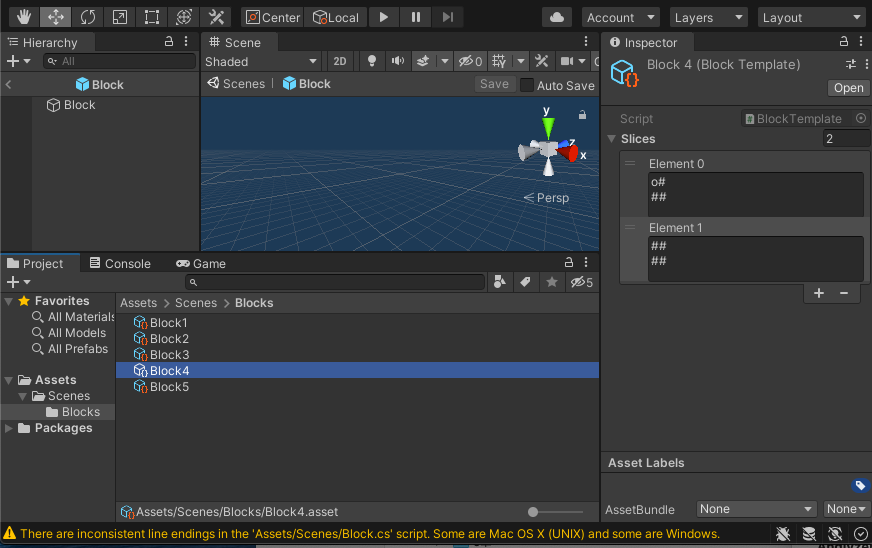
これらのアセットは「Block」プレハブの「BlockTemplate」フィールドに設定して使用することを想定しています。
実際にはスクリプトからこれらの「BlockTemplate」アセットを設定するようにするので「Block」プレハブに設定しておく必要はありません。
ただし確認用として「Block」コンポーネントに次のメンバを追加すると簡単にブロックの形がわかるので追加するといいでしょう。
|
1 2 3 4 5 6 |
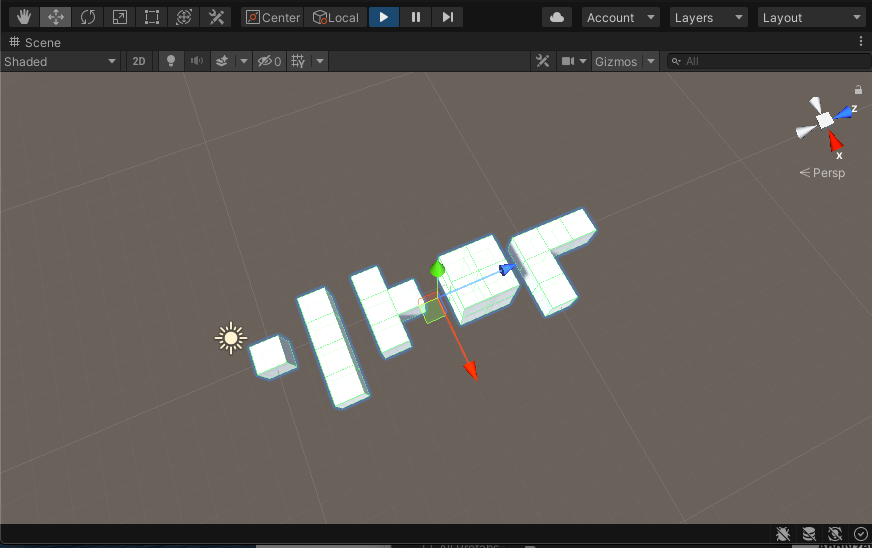
// Block.cs BlockTemplateに設定したブロックの内容を確認するための処理の追加 //次のものを確認の時のみ追加 private void Start() { CreateBlockGameObjects(); } |
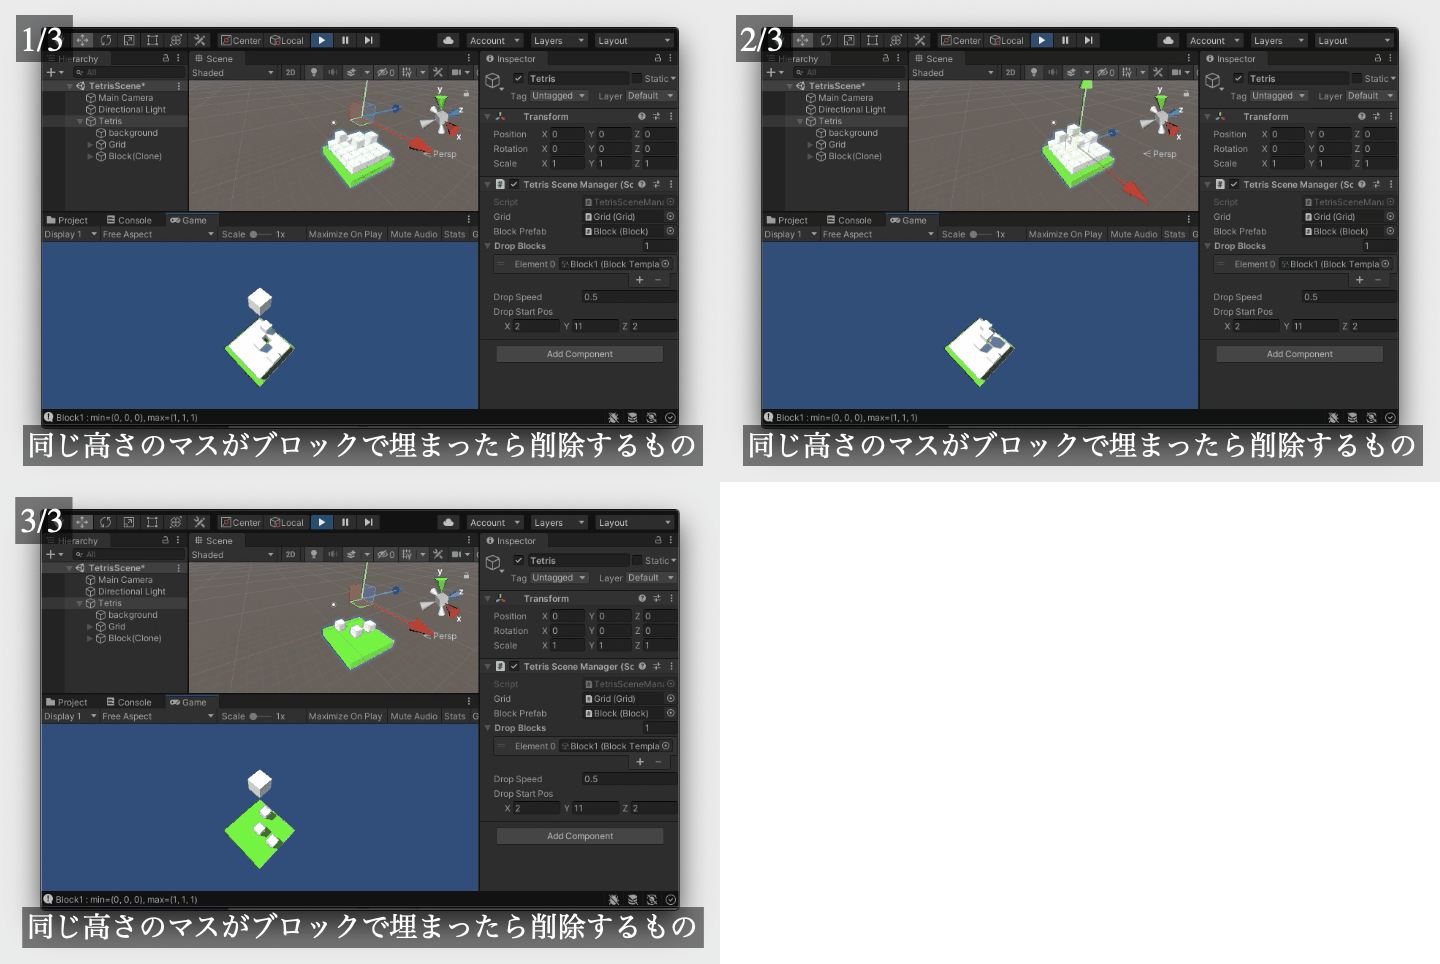
上の設定で作成した「BlockTemplate」の見た目は次のものになります。
まとめ
今回の記事ではブロックを作成しました。
複数のクラスでブロックを表すようにしていますが、次のような役割分担となっていますので参考にしてください。
- Blockコンポーネント:グリッド内のブロックの位置などを管理するためのクラス。
- BlockTemplate : ブロックをアセットとして管理するためのクラス
- BlockInstance : ブロックを表すための基本となるクラス。
まとめますと以下のようになります。
- ブロックを表すコンポーネントの作成
- ブロックの種類を表すScriptableObjectの作成
- ブロックの基本情報を表すクラスの作成
- ゲーム中に出てくるブロックのアセットを作成
それでは次の記事に行ってみましょう!
次の記事:



コメント